

Table of Contents
How to Use Vocal Compressor?
Vocal compression is an important step in music production for creating a refined sound. This article covers everything from how to set up your compressor and dial in the optimum settings to advanced techniques like as parallel and side-chain compression. Learn how to control dynamic range, establish voice presence, and solve common difficulties in order to produce professional-quality vocal mixes.
Introduction to Vocal Compressor
Vocal compressor is an essential step in music production, ensuring a polished and professional sound. Compression, at its foundation, is the process of limiting the dynamic range of a recorded vocal, hence minimizing the gap between the quietest and loudest sections of the performance. This method guarantees that the vocal is consistently audible and balanced in the mix.
Maintaining constant volume levels is one of the most difficult aspects of vocal recording. Singers sometimes change their intensity, sometimes accidentally, resulting in particular words or phrases being too loud or practically inaudible. Producers can smooth out these variations by using a vocal compressor, ensuring that the entire voice performance is heard clearly and evenly.
Harsh peaks are another common issue in vocal tracks. Sudden loud sounds can cause distortion and can be jarring to the listener, detracting from the overall quality of the track. A properly set vocal compressor can tame these peaks, providing a more controlled and pleasant listening experience.
Maintaining the vocal’s presence in the mix is critical, as it is frequently the focal point of a song. Without compression, the vocal might quickly become buried amid the other instruments, particularly in more complicated or densely constructed recordings. A compressor maintains the vocal’s prominence, ensuring it shines out without dominating other sounds in the mix.
By resolving these issues, vocal compression not only improves the clarity and intelligibility of the vocal performance, but also adds to a coherent and professional-sounding finished result. Understanding and efficiently using a voice compressor is thus critical for any producer seeking to make high-quality music.
Vocal compressor settings
Before applying a vocal compressor to your tracks, there are some fundamental steps you must consider to ensure optimal results. Choosing the right type of compressor is crucial. You have two main options: analog compressors and digital plugins. Analog compressors provide a warm, rich sound often sought after in high-fidelity recordings. On the other hand, digital plugins offer unparalleled flexibility and control, making them a popular choice for many modern producers.
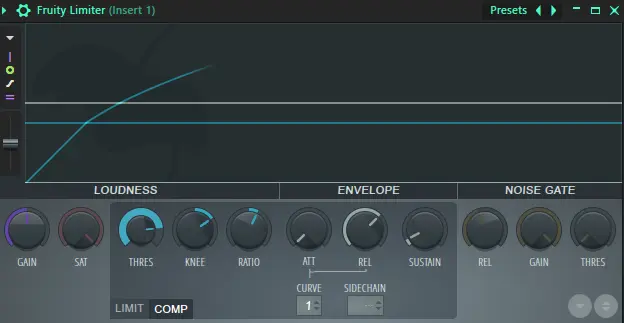
Once you’ve chosen your compressor, you should become acquainted with its controls. The threshold specifies the point at which the compressor begins to reduce dynamics, whilst the ratio controls the magnitude of this reduction. The attack and release parameters determine how quickly the compressor reacts to the incoming signal and returns to normal after processing it. Gain, often known as makeup gain, compensates for any signal level loss due to compression.
Your signal chain configuration also influences how well your voice compressor operates. A well-structured signal chain guarantees that each processing element improves the vocal track’s overall quality. Begin with the essential preprocessing techniques, such as EQ, de-essing, and noise reduction. EQ helps to balance frequencies, so vocals fit comfortably in the mix. De-essing reduces harsh sibilant sounds, while noise reduction removes undesirable background noise, resulting in a clearer vocal track to work with.
A clean, professional sound may be achieved by properly adjusting your voice compressor and signal chain. Take the time to experiment with different settings and learn how each control impacts the dynamics of your voice. This will help you to make more educated judgments, resulting in clear and compelling vocals in the final mix.
Dialing in Compressor Settings for Vocals
The process of adjusting the compressor settings for voices is rigorous, comprising various crucial elements that determine the final sound. One of the most important parameters to consider is the threshold. The threshold decides at what point the compressor begins to lower the signal’s gain. For voices, it is critical to set the threshold at a level that limits the dynamic range while preserving the vocal’s inherent expressiveness. A decent starting point is to set the threshold 3-6 dB lower than your vocal’s loudest peak. This range compresses only the peaks, keeping the vocal’s inherent dynamics.
The attack and release periods are equally important in voice compression. The attack time determines how quickly the compressor responds to signals that surpass the threshold. A rapid attack time is commonly utilized to capture brief transients, however it can also dull the voice if not properly calibrated. In contrast, a slower attack time allows the early transients to pass through, keeping the vocal’s clarity and power. A common assault setting for voices might be between 10 and 30 milliseconds.
The release time regulates how soon the compressor stops decreasing gain after the input signal falls below the threshold. A balance is essential here; too quick a release might produce a pounding sound, whilst too sluggish will result in an unduly compressed or unnatural vocal. For most voice files, experimenting with a medium release time of 50-200 milliseconds is a decent place to start.
Another important consideration is the compression ratio, which has a direct impact on the vocal presence and body. Lower ratios, such as 2:1 or 3:1, provide slight compression while retaining most of the vocal’s inherent qualities. Higher compression ratios, such as 4:1 or 8:1, can bring the vocal to the forefront of the mix but might sound artificial if used excessively.
For practical purposes, listen closely and make tiny improvements. Begin with a modest threshold, modify the attack to catch the necessary transients without sacrificing clarity, then set the release to prevent pumping. Adjust the ratio to either softly improve or raise the vocal’s prominence depending on the mix context. These thorough changes can help you produce a polished and powerful voice tone.
Fine-Tuning and Additional Techniques
Once the basis of vocal compression is established, further approaches may be used to improve the vocal quality and texture. One such approach is parallel compression, which combines compressed and uncompressed signals. This method allows the voice to maintain its dynamics while benefiting from compression. Adjusting the proportion of compressed and uncompressed signals allows for a richer, more present voice sound that cuts through the mix without being unduly squished.
Side-chain compression is another effective instrument in the mix engineer’s armory, especially for retaining vocal prominence. This approach uses the vocal track to activate compression on other components of the mix, such as a bass or synth pad. The result is a minor ducking effect in certain recordings, which allows the vocal to shine through. Adjusting the side-chain compressor’s attack and release periods allows you to fine-tune how other parts react to the voice, resulting in a seamless and natural integration.
Layer-specific compression is especially essential when working with harmonies, background voices, and lead vocals. Because of its significance in the mix, each layer frequently need a unique compression strategy. Lead vocals benefit from more aggressive settings to stay constantly forefront, whilst harmonies and background voices may require milder compression to keep their supporting roles. Using unique compression settings for each layer results in a balanced and cohesive vocal mix.
Troubleshooting typical difficulties is an important aspect of the vocal compression process. Over compression can produce a lifeless, artificial sound. If a vocal sounds “over-compressed,” lowering the compression ratio or extending the attack time might help restore some natural dynamics. Pumping, which is commonly caused by excessively quick release times, can be reduced by modifying the release parameters. Regular A/B testing of the compressed track versus the original can help to avoid such difficulties, ensuring that the vocal keeps its natural character while benefiting from compression.
Check out this blog related to this blog
Check our featured blog
Difference Between Home Studio and Professional Studio


Leave a Reply